Bevy Cameras
Each Camera is responsible for 3 main things:
- The render target which is the region of the screen to draw something
- The projection which determines how to transform 3D into 2D (our screen)
- The position of the view in our scene to capture and transform
Usually a camera's render target is a Window. That is, each Camera is given a region of the Window that it is entitled to draw on called a Viewport.
Each frame, Bevy will start by drawing the ClearColor over the camera's viewport and then draw things from scratch on the screen. This color ends up being the background where nothing is rendered yet.
The coordinate system in Bevy is right handed so:
- X increases going to the right
- Y increases going up
- Z increases coming towards the screen
- The default center of the screen is (0, 0)
Bevy uses a RenderGraph to determine when to run each part of its rendering pipeline to draw everything in the correct order of dependency. Each camera you spawn is given a unique name and added to this graph as a node.
Creating a camera
When we spawn a camera we use Camera2d or Camera3d depending on our game.
fn initialize_2d_camera(mut commands: Commands) {
  commands.spawn(Camera2d);
}
It is useful to define a MainCamera with a Camera2d as a required component. This makes it easier to add other cameras later.
// Useful for marking the "main" camera if we have many
#[derive(Component)]
#[require(Camera2d)]
pub struct MainCamera;

fn initialize_camera(mut commands: Commands) {
  commands.spawn(MainCamera);
}
Camera behavior is usually quite generic and separate from the rest of the game logic so usually I prefer creating a camera plugin and adding it to the app:
pub struct CameraPlugin;

impl Plugin for CameraPlugin {
  fn build(&self, app: &mut App) {
    app.add_systems(Startup, initialize_camera);
  }
}

fn main() {
  App::new()
    .add_plugins(DefaultPlugins)
    .add_plugins(CameraPlugin)
    .run();
}
Viewports
Bevy's cameras are really proxies for a Viewport. The Viewport is what defines the area of our camera's RenderTarget we are allowed to draw on.
So the Camera is deciding what to render and there Viewport is deciding where to render.
Each Camera can only have a single RenderTarget which can be one of 4 things:
WindowImageTextureView(useful for OpenXR)Noneuseful certain pre-rendering techniques
So even though we might only have a single rendering target (the Window), we can still have multiple viewports on that window. Each one can take up a region of the screen and assigned its own separate camera.
This is how you can accomplish something like split screen or a minimap.
Camera projection
Bevy's default 2D camera uses an orthogonal projection with a symmetric frustum.
Don't panic! Let's break that all down.
Projection refers to the process of transforming a 3D scene into a 2D representation on a screen or viewport.
Since computer screens are 2D, we need to convert the 3D world of objects and their positions into a flat image that can be displayed.
An orthogonal projection is a type of projection where objects retain the same size regardless of distance from the camera. There are no vanishing points. Think about looking down on a map from above. Everything looks the same size.
A frustum, on the other hand, refers to a truncated pyramid shape that represents the viewing volume or the field of view in computer graphics. It is like a pyramid with the top cut off, resulting in a smaller pyramid shape.
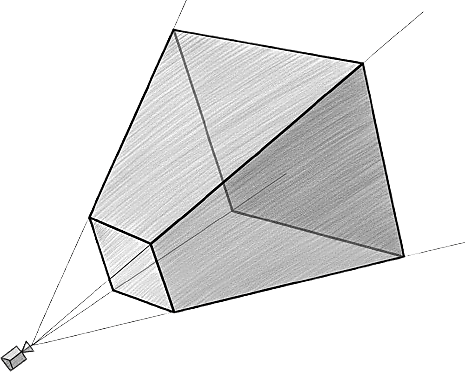
In a symmetric frustum, the shape of the truncated pyramid is balanced or symmetrical, which means that the left and right sides, as well as the top and bottom sides, are equal in size and shape.
The default for a 3D camera is a perspective projection which mimics how our eyes see the world. Objects further away appear smaller, and parallel lines converge towards vanishing points.
Controlling a 2D Camera
In 2D the mathematics is much simpler since we don't have to worry about depth.
To move your camera around the scene we just need to change its translation:
fn camera_movement_system(
  time: Res<Time>,
  input: Res<ButtonInput<KeyCode>>,
  mut transform: Single<&mut Transform, With<MainCamera>>,
) {
  let dt = time.delta_secs();
  let movement_speed = 500.;

  let mut direction = Vec3::ZERO;

  if input.pressed(KeyCode::KeyW) {
    direction.y += 1.;
  }
  if input.pressed(KeyCode::KeyS) {
    direction.y -= 1.;
  }
  if input.pressed(KeyCode::KeyA) {
    direction.x -= 1.;
  }
  if input.pressed(KeyCode::KeyD) {
    direction.x += 1.;
  }

  if direction != Vec3::ZERO {
    direction = direction.normalize();
    transform.translation += direction * dt * movement_speed;
  }
}
Zooming in and out is just changing the scale of the camera's projection. In a 2D game we usually use an orthographic projection which means there is no perspective distortion (things don't get smaller as they get further away).
fn zoom_control_system(
  input: Res<ButtonInput<KeyCode>>,
  mut projection: Single<&mut Projection, With<MainCamera>>,
) {
  let Projection::Orthographic(perspective) = projection.as_mut() else {
    return;
  };

  if input.pressed(KeyCode::Minus) {
    perspective.scale += 0.1;
  }
  if input.pressed(KeyCode::Equal) {
    perspective.scale -= 0.1;
  }

  perspective.scale = perspective.scale.clamp(0.1, std::f32::consts::FRAC_PI_2);
}
Controlling a 3D Camera
3D cameras and 3D programming in general is quite a bit more complex.
Luckily Bevy includes some helper methods on Transform to make the code easier to read and write. Helper methods like forward() and right() make it easy to get the local axes of the camera.
fn camera_movement_system(
  input: Res<ButtonInput<KeyCode>>,
  mut camera: Single<&mut Transform, With<MainCamera>>,
  time: Res<Time>,
) {
  let dt = time.delta_secs();
  let move_speed = 10.0;

  let mut direction = Vec3::ZERO;

  // Forward/Backward (W/S)
  if input.pressed(KeyCode::KeyW) {
    direction += *camera.forward();
  }
  if input.pressed(KeyCode::KeyS) {
    direction -= *camera.forward();
  }

  // Left/Right (A/D)
  if input.pressed(KeyCode::KeyA) {
    direction -= *camera.right();
  }
  if input.pressed(KeyCode::KeyD) {
    direction += *camera.right();
  }

  if direction != Vec3::ZERO {
    let direction = direction.normalize();
    camera.translation += direction * move_speed * dt;
  }
}
If we want to rotate the camera we would manipulate the transform's pitch and yaw according to the movements our mouse.
fn rotate_camera_to_mouse(
  time: Res<Time>,
  mut mouse_motion: MessageReader<MouseMotion>,
  mut transform: Single<&mut Transform, With<MainCamera>>,
) {
  let dt = time.delta_secs();
  // The factors are just arbitrary mouse sensitivity values.
  // It's often nicer to have a faster horizontal sensitivity than vertical.
  let mouse_sensitivity = Vec2::new(0.12, 0.10);

  for motion in mouse_motion.read() {
    let delta_yaw = -motion.delta.x * dt * mouse_sensitivity.x;
    let delta_pitch = -motion.delta.y * dt * mouse_sensitivity.y;

    // Add yaw which is turning left/right (global)
    transform.rotate_y(delta_yaw);

    // Add pitch which is looking up/down (local)
    const PITCH_LIMIT: f32 = std::f32::consts::FRAC_PI_2 - 0.01;
    let (yaw, pitch, roll) = transform.rotation.to_euler(EulerRot::YXZ);
    let pitch = (pitch + delta_pitch).clamp(-PITCH_LIMIT, PITCH_LIMIT);

    // Apply the rotation
    transform.rotation = Quat::from_euler(EulerRot::YXZ, yaw, pitch, roll);
  }
}
MouseMotion is a message Bevy publishes for us automatically. It contains the delta of the physical position of our mouse.
A Quat is a quaternion (don't panic!), a 4D mathematical object (don't panic!) that represents a rotation in 3D space. It avoids something called Gimbal lock which is caused by using Euler angles (the intuitive ones) and allows for computationally efficient smooth interpolations.
A quaternion lets you tell a Transform to rotate around a specific axis by some angle.
The EulerRot::YXZ specifies the order we want the rotation to be applied. We said:
- First apply the yaw around a global y value
- Then apply the pitch around a local x value
- Finally roll around the z axis
Focusing in on just this chunk of code:
let (yaw, pitch, roll) = transform.rotation.to_euler(EulerRot::YXZ);
let pitch = (pitch + delta_pitch).clamp(-PITCH_LIMIT, PITCH_LIMIT);
transform.rotation = Quat::from_euler(EulerRot::YXZ, yaw, pitch, roll);
- We decomposed the quaternion into its Euler components.
- Then we adjusted the pitch based on the mouse Y motion (clamped so we can't flip upside down).
- And finally we rebuild the rotation quaternion with the new pitch, existing yaw and the roll.
rotate_y is applying the global rotation directly. That's fine for yaw because rotating around the Y axis is not sensitive to the current pitch.
For the pitch we want it relative to the camera's current orientation (around the x axis). That's why we need the special handling with the quaternion.
To zoom in with our camera we manipulate the Projection component which holds the information about how to relate the distances in 3D to the 2D viewport.
The particular projection in 3D is a Perspective projection which mimics the way our eyes see the world.
fn zoom_control_system(
  input: Res<ButtonInput<KeyCode>>,
  mut projection: Single<&mut Projection, With<MainCamera>>,
) {
  let Projection::Perspective(perspective) = projection.as_mut() else {
    return;
  };

  if input.pressed(KeyCode::Minus) {
    perspective.fov += 0.1;
  }
  if input.pressed(KeyCode::Equal) {
    perspective.fov -= 0.1;
  }

  perspective.fov = perspective.fov.clamp(0.1, std::f32::consts::FRAC_PI_2);
}
Bevy's built-in camera controllers
Usually you would want to heavily customize and control your game's camera. While developing though it can be useful to have a quick way to move around the scene.
Bevy provides some built-in camera controllers to help with this:
FreeCameraallows noclip like movement with WASD and mouse lookPanCameraallows panning and zooming around a point of interest
To add these controllers you can enable the specific feature in your Cargo.toml:
[dependencies]
bevy = { version = "0.18", features = ["free_camera"] }
Then we can remove our old movement systems from the 3D example above and replace it with a main camera that requires the other components:
use bevy::{
  camera_controller::free_camera::{FreeCamera, FreeCameraPlugin},
  color::palettes::basic::SILVER,
  prelude::*,
};

#[derive(Component)]
#[require(Camera3d, FreeCamera)]
struct MainCamera;

fn spawn_camera(mut commands: Commands) {
  commands.spawn((
    MainCamera,
    Transform::from_xyz(8.0, 16.0, 8.0).looking_at(Vec3::ZERO, Vec3::Y),
    PointLight {
      shadow_maps_enabled: true,
      intensity: 10_000_000.,
      range: 100.0,
      shadow_depth_bias: 0.2,
      ..default()
    },
  ));
}
Render Layers
When we want a camera to only render certain entities we can use the RenderLayers component.
By default all components are rendered on layer 0 and there are 32 TOTAL_LAYERS to choose from.
Attaching it to our camera sets which entities it should render.
Attaching it to our other entities sets which camera should do the rendering.
use bevy::camera::visibility::RenderLayers;

// RenderLayers are Copy so aliases work to improve clarity
const BACKGROUND: RenderLayers = RenderLayers::layer(1);

const FOREGROUND: RenderLayers = RenderLayers::layer(2);

#[derive(Component)]
struct Player;

fn initialize_cameras(mut commands: Commands) {
  commands.spawn((FOREGROUND, MainCamera));
  commands.spawn((Camera2d, BACKGROUND));
}

fn spawn_player(mut commands: Commands) {
  commands.spawn((Player, FOREGROUND));
}
Rendering Order
Multiple cameras will all render to the same window. When we want to control the ordering of this rendering we can use a priority.
Cameras with a higher order are rendered later, and thus on top of lower order cameras.
We can imagine it a bit like an oil painter. The first layer you apply to the canvas is the background, and the subsequent layers are painted on over top.
fn render_order(mut commands: Commands) {
  // This camera defaults to priority 0 and is rendered "first" / "at the back"
  commands.spawn(Camera3d::default());

  // This camera renders "after" / "at the front"
  commands.spawn((
    Camera3d::default(),
    Camera {
      // renders after / on top of the main camera
      order: 1,
      // don't clear the color while rendering this camera
      clear_color: ClearColorConfig::None,
      ..default()
    },
  ));
}
Mouse coordinates
When you place your mouse on the screen it would two positions:
- On-screen coordinates (the position of the pixel on a screen)
- World coordinates (the position of the mouse projected onto our game)
So when we read our Window::cursor_position we are only getting the on-screen coordinates. We would have to further convert them by projecting them according to our camera:
fn log_mouse_coordinates(
  window: Single<&Window>,
  camera_query: Single<(&Camera, &GlobalTransform), With<MainCamera>>,
) {
  let (camera, global_transform) = camera_query.into_inner();

  if let Some(cursor_position) = window.cursor_position() {
    // Convert the cursor position to world coordinates
    if let Ok(ray) = camera.viewport_to_world(global_transform, cursor_position)
    {
      let world_position = ray.origin.truncate();
      info!("World coords: {}/{}", world_position.x, world_position.y);
    }
  } else {
    warn!("Cursor position is not available.");
  }
}